I will relate here my experiments regarding enlarging 35mm negatives onto cyanotype.
My own reasons for doing cyanotype rather than the regular silver-based process are partly because of the cost and relative constraints brought by having to use commercial materials, limiting me to whatever papers are still produced by Ilford and co., but foremost because of the toxicity of silver process. Keeping and disposing of the spent chemicals is cumbersome, some of it inevitably ends up on my hands when processing film and paper, etc.
Cyanotype has few of these drawbacks, if any. I can use whatever paper I have on (although some of them are better suited than others), the chemicals are very inexpensive, and as far as I know (although I am no expert) they are mostly harmless, and can be disposed of in your sink.
Since I already do (silver) anolog photography, it feels more satisfying in a way to be able to print onto paper without ever have to go through the process of a digital conversion, printing on transparency, and then finaly printing on paper. I also don't have an inkjet printer, and laser printers are not suited at all to printing digital negatives.
Another solution would be to start using medium format film and cameras, but that is an investment that I am not sure I am willing to make. The size of the equipment is also rather impractical for making simple holiday photos, and even 6x9 is smaller than the 10x15 of a regular print. Large format is out of question.
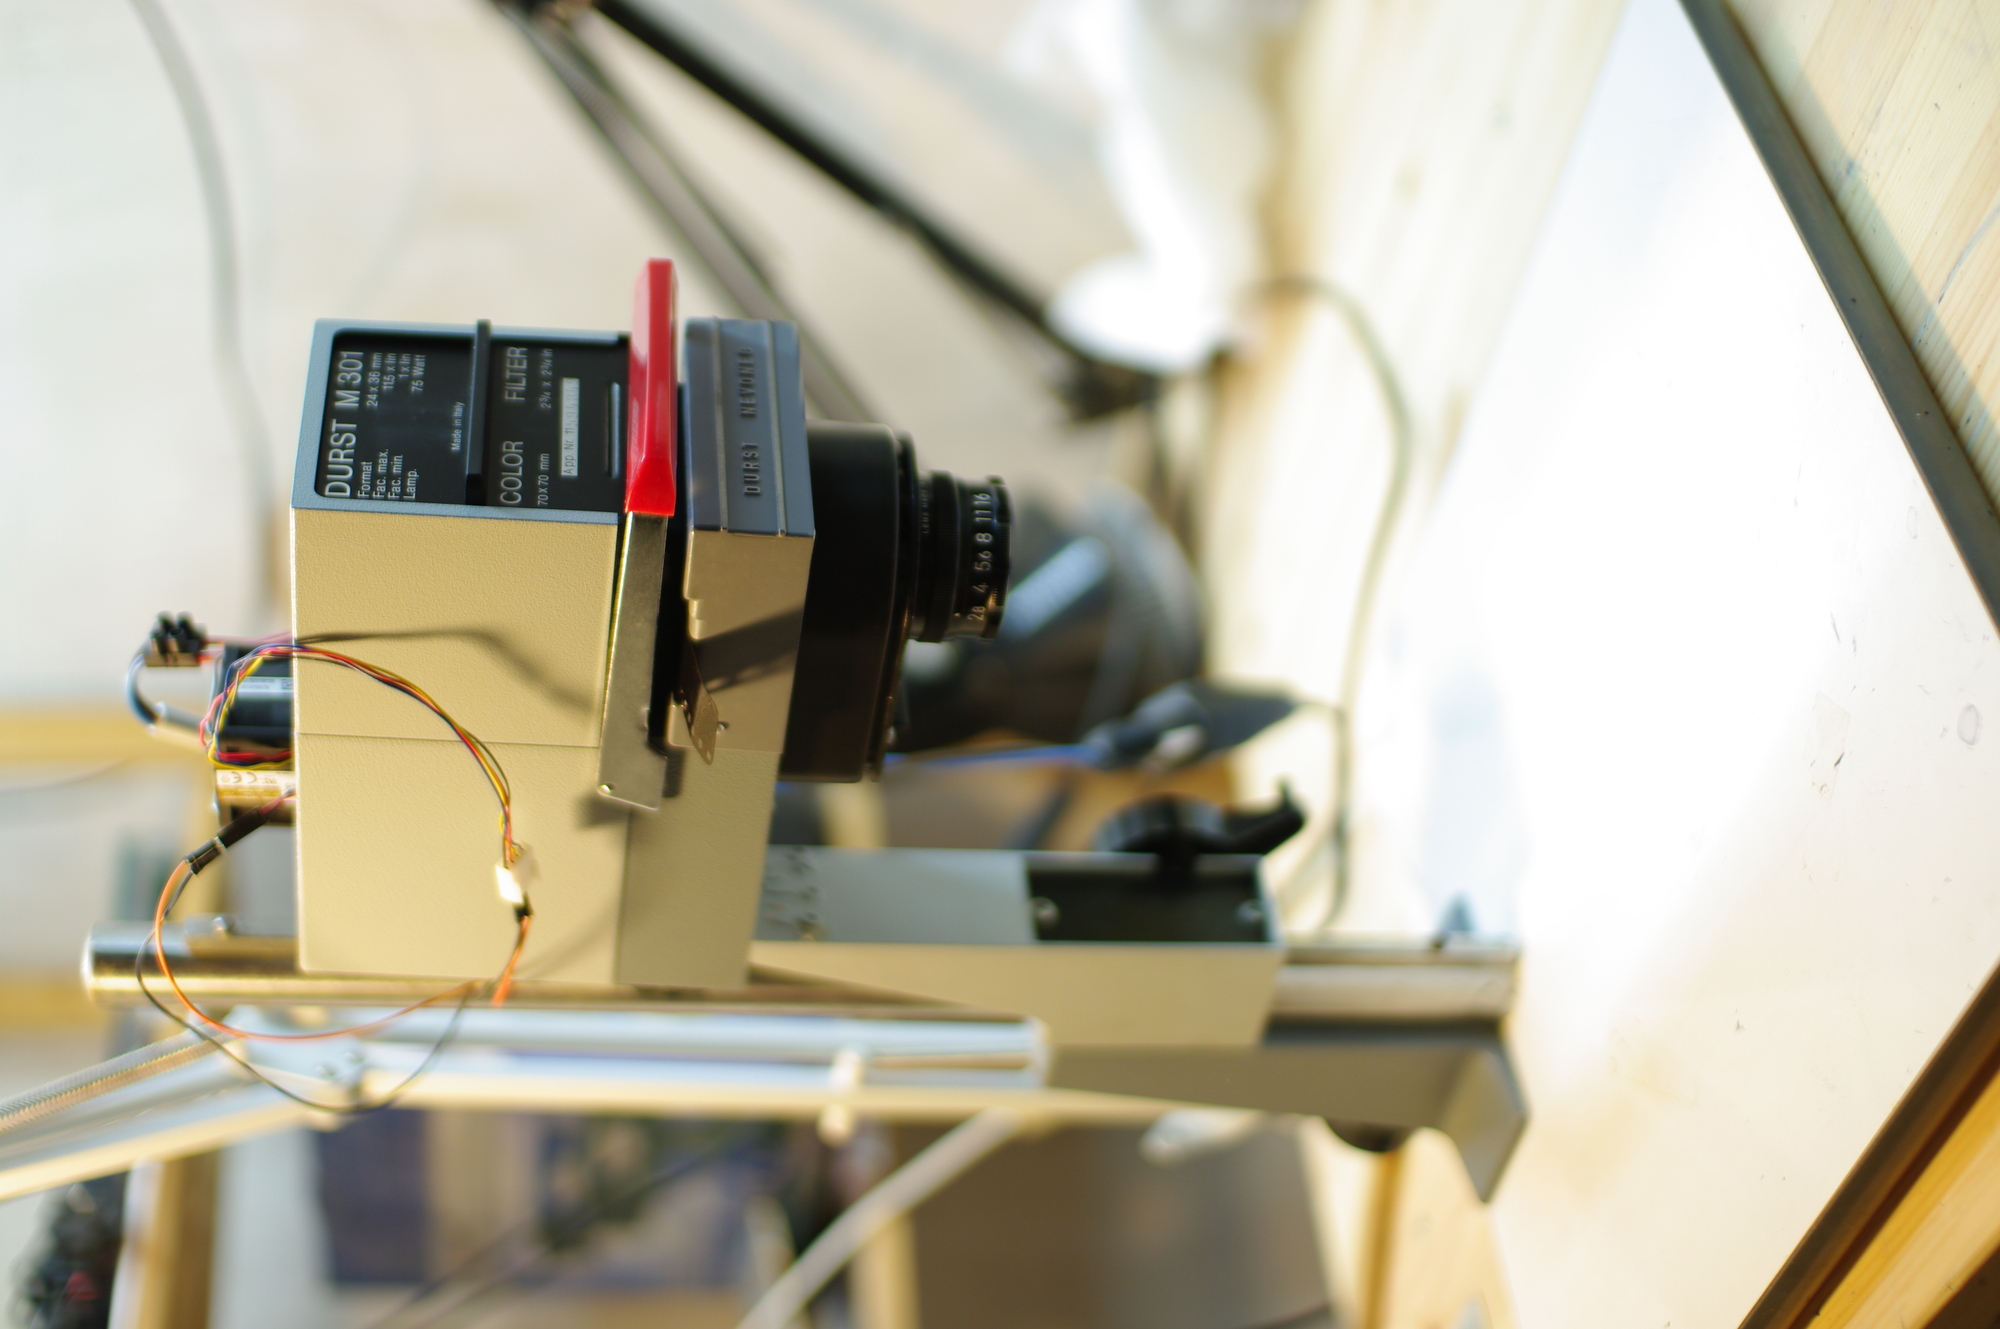
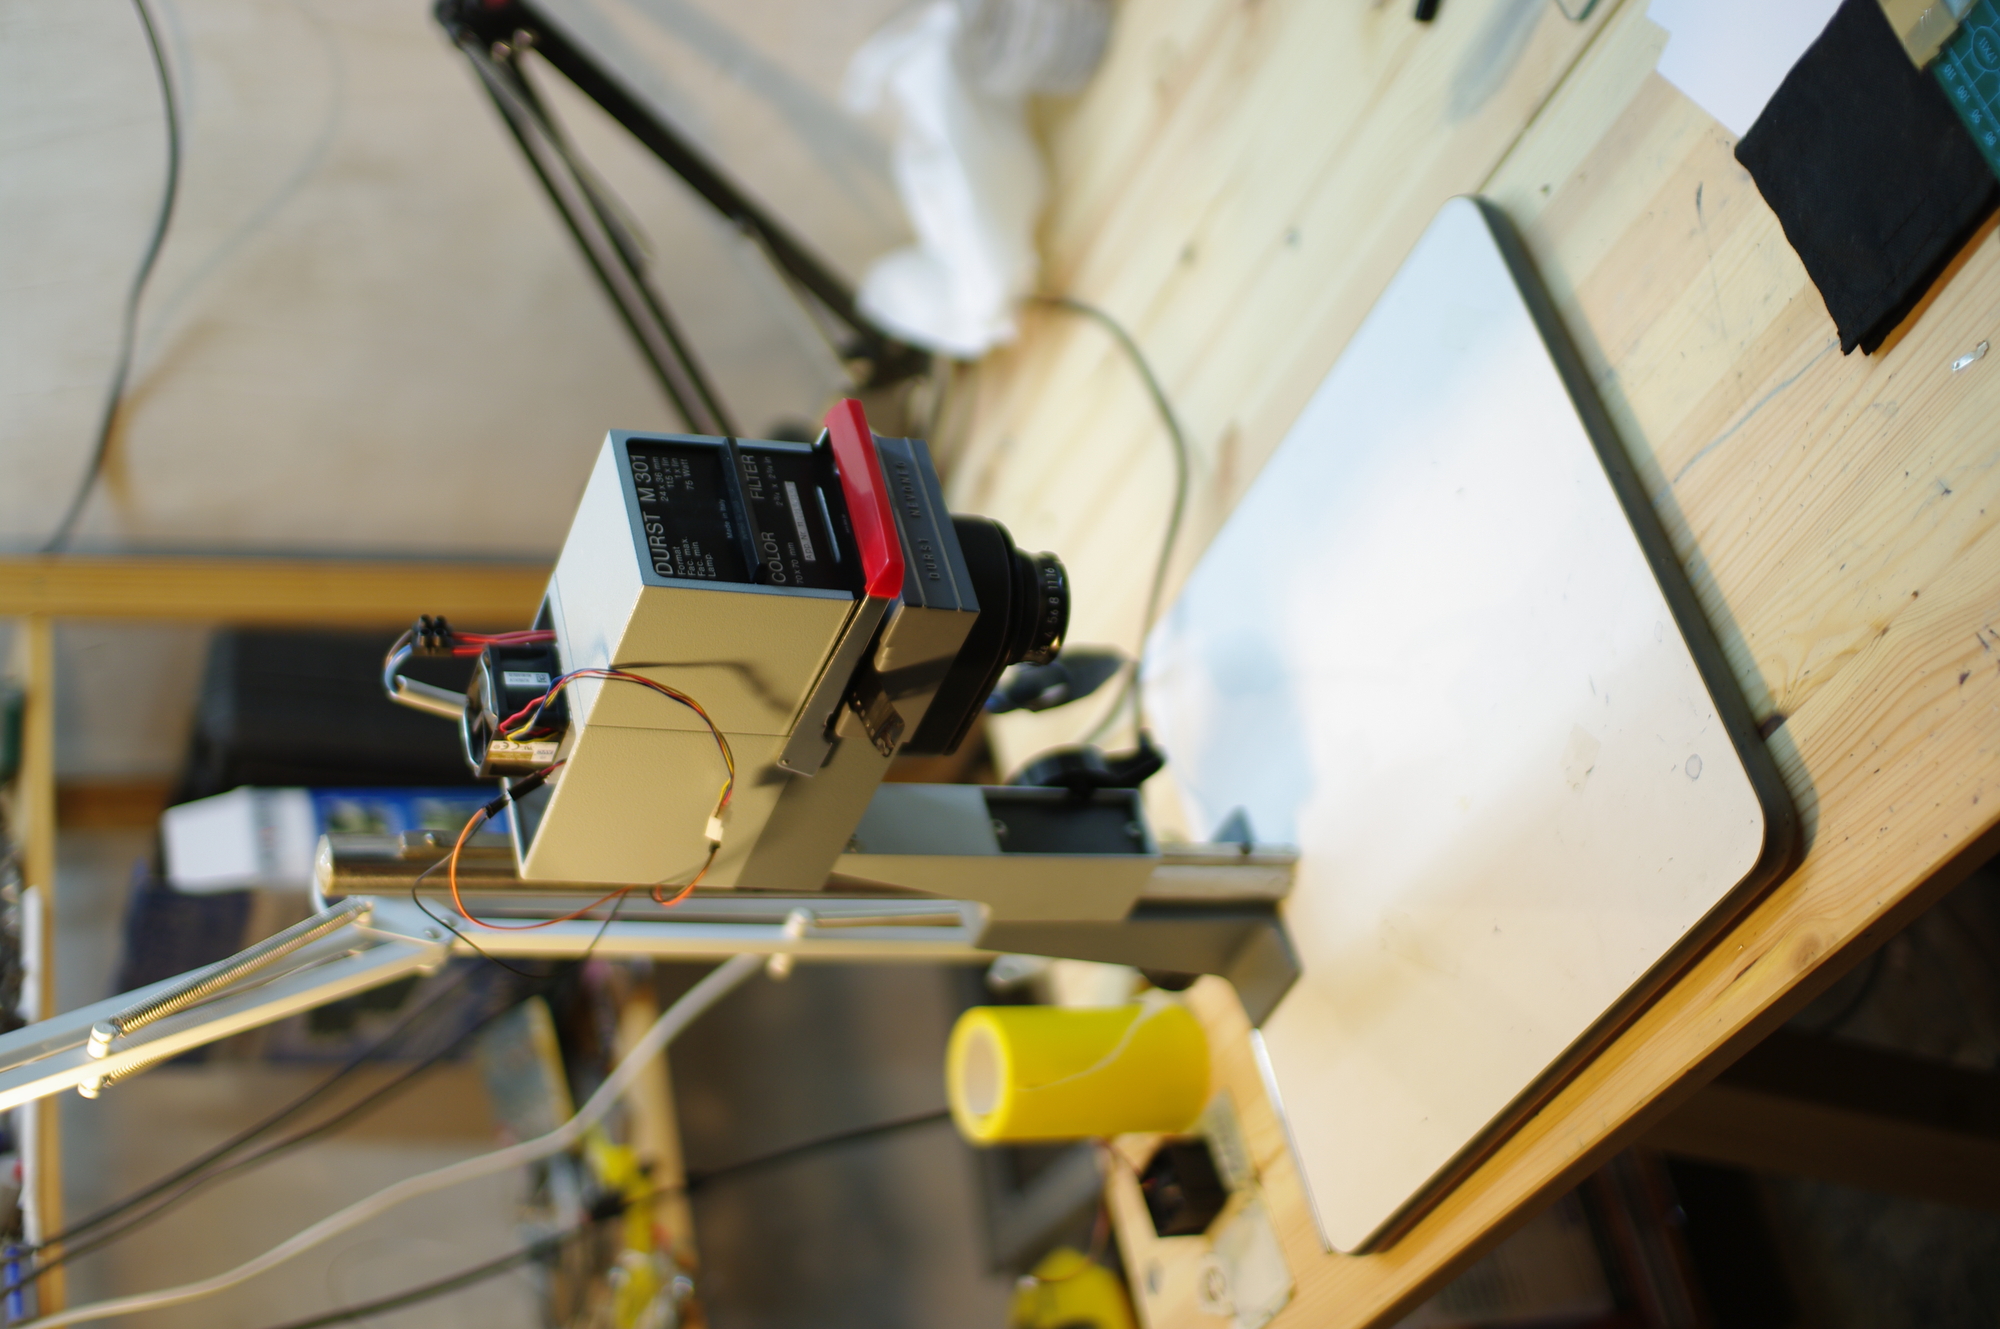
My setup is actually quite simple. It consists of a Durst M301 enlarger, from which I removed the lamp holder, and replaced it with a 50W UV LED (395nm wavelength) and later a 100W LED, on an aluminium radiator with a fan that is probably more powerful than needed, but the noise is not a problem as this runs in my cellar.
This is a cheap UV LED from Aliexpress that runs directly on 220V. The wavelength is 395nm, which has given me the best results. I think 395nm is the right balance between glass transmittance and cyanotype sensitivity. There is a lot of glass to go through here, the two lenses of the condenser and the three of the enlarger lens.
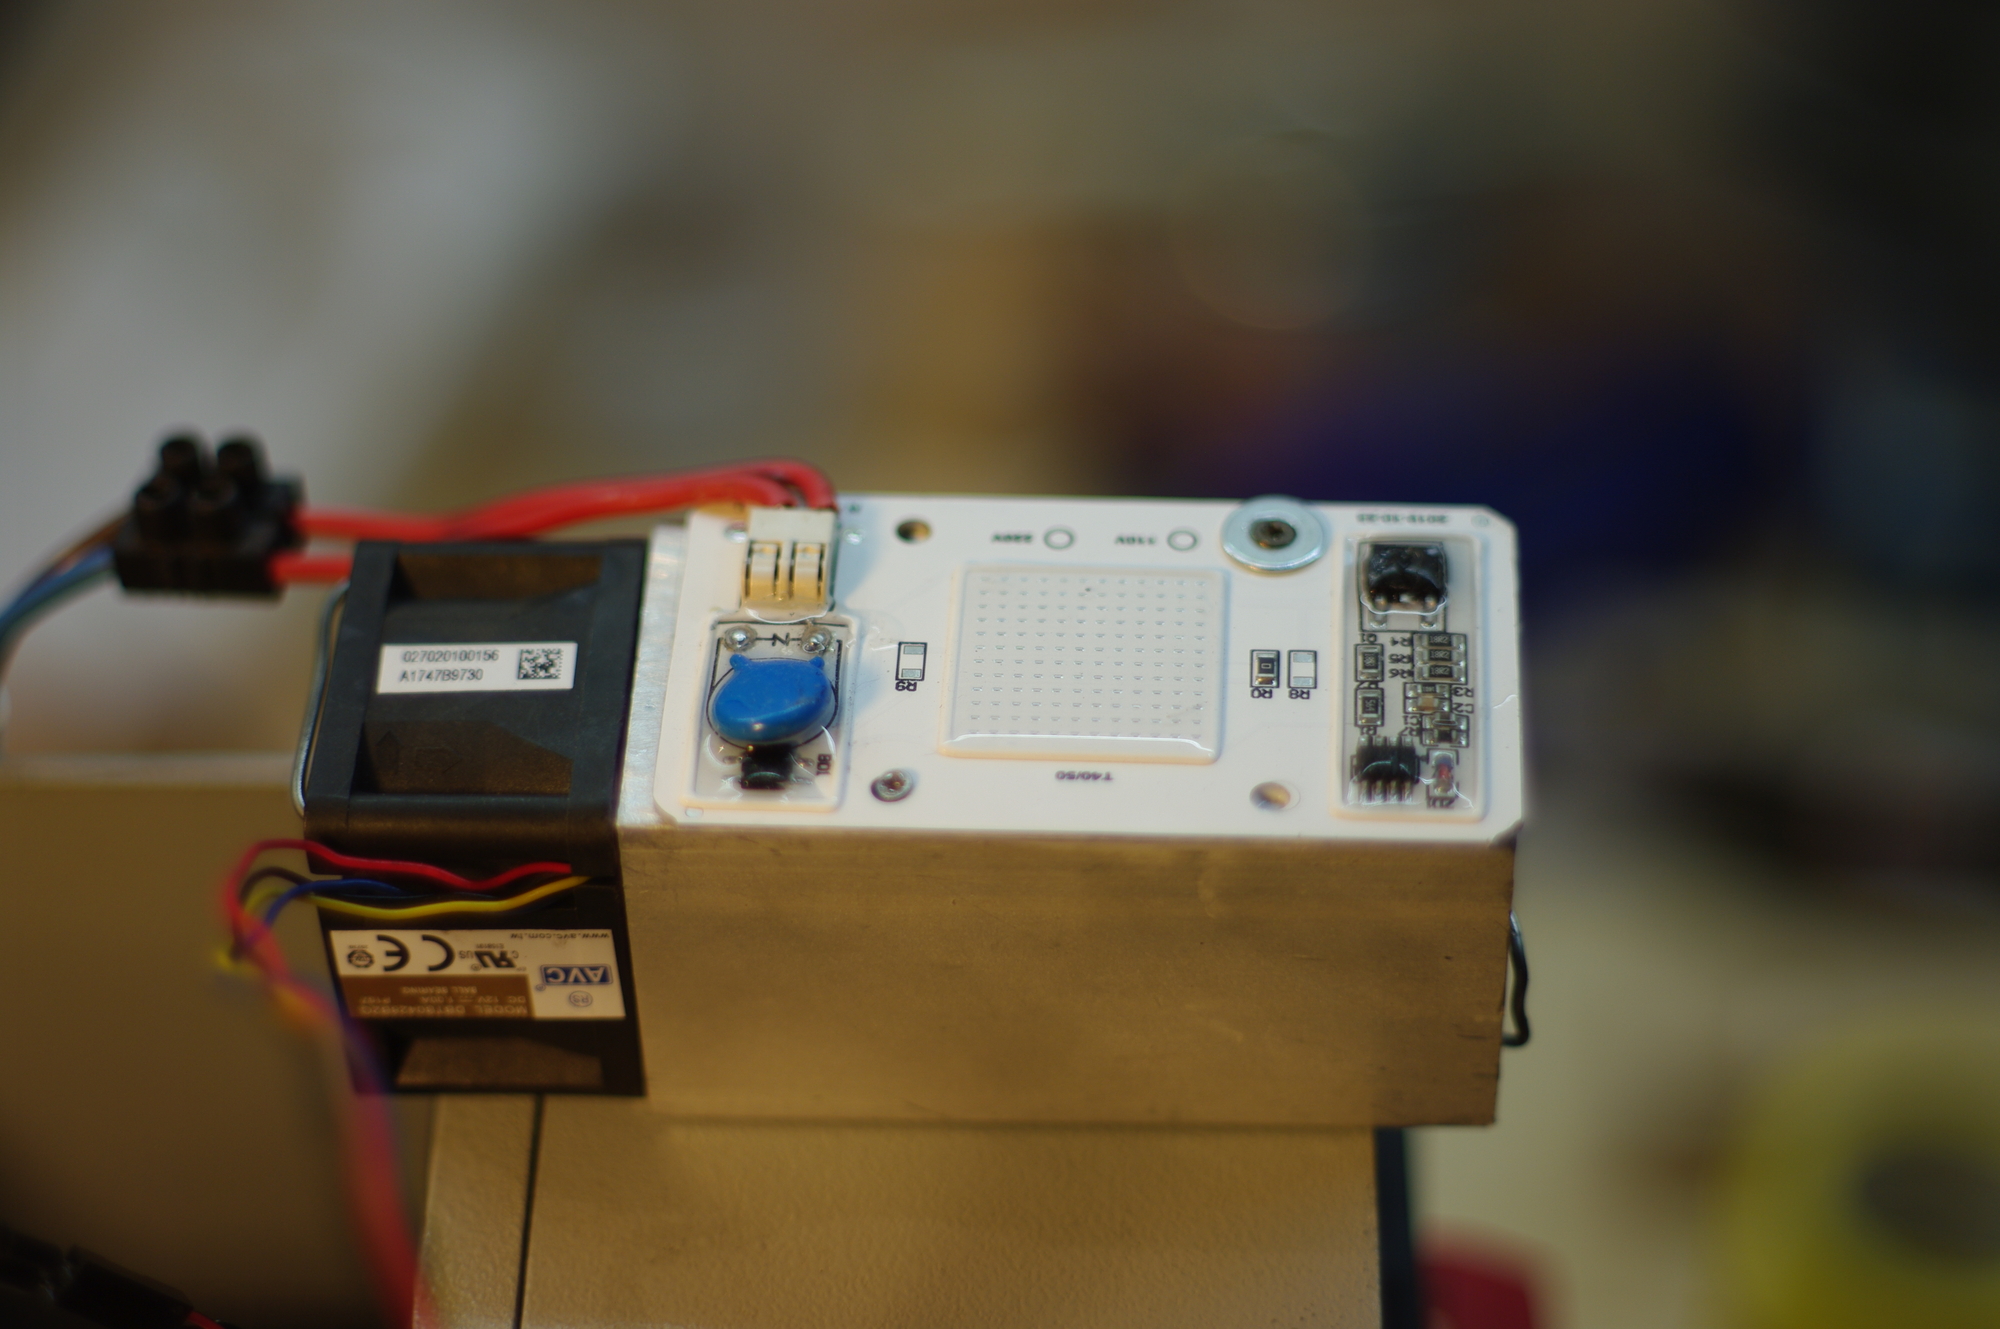
I eventually replaced the previous LED with new ones which necessitated a slightly more involved installation (as they run on 36V and use an external power supply) but are more powerful, running at 100W for now but theoretically able to run up to 500W or so. My cooling fan was already oversized, so I only had to replace the LEDs and I kept the rest of the installation.
The condenser unit does get fairly warm now but nothing really worrying, although I would be wary of getting above 100W.
After removing the lamp holder, there is enough space to fit the LED unit (although a shorter radiator would have fit a bit better). The LED sits right before the square opening to the condenser. I use an El-Nikkor f/2.8 lens because I need all the light I can get, although maybe its 6 elements block more UV than the 4 elements of the f/4. I have noticed little difference between the two.


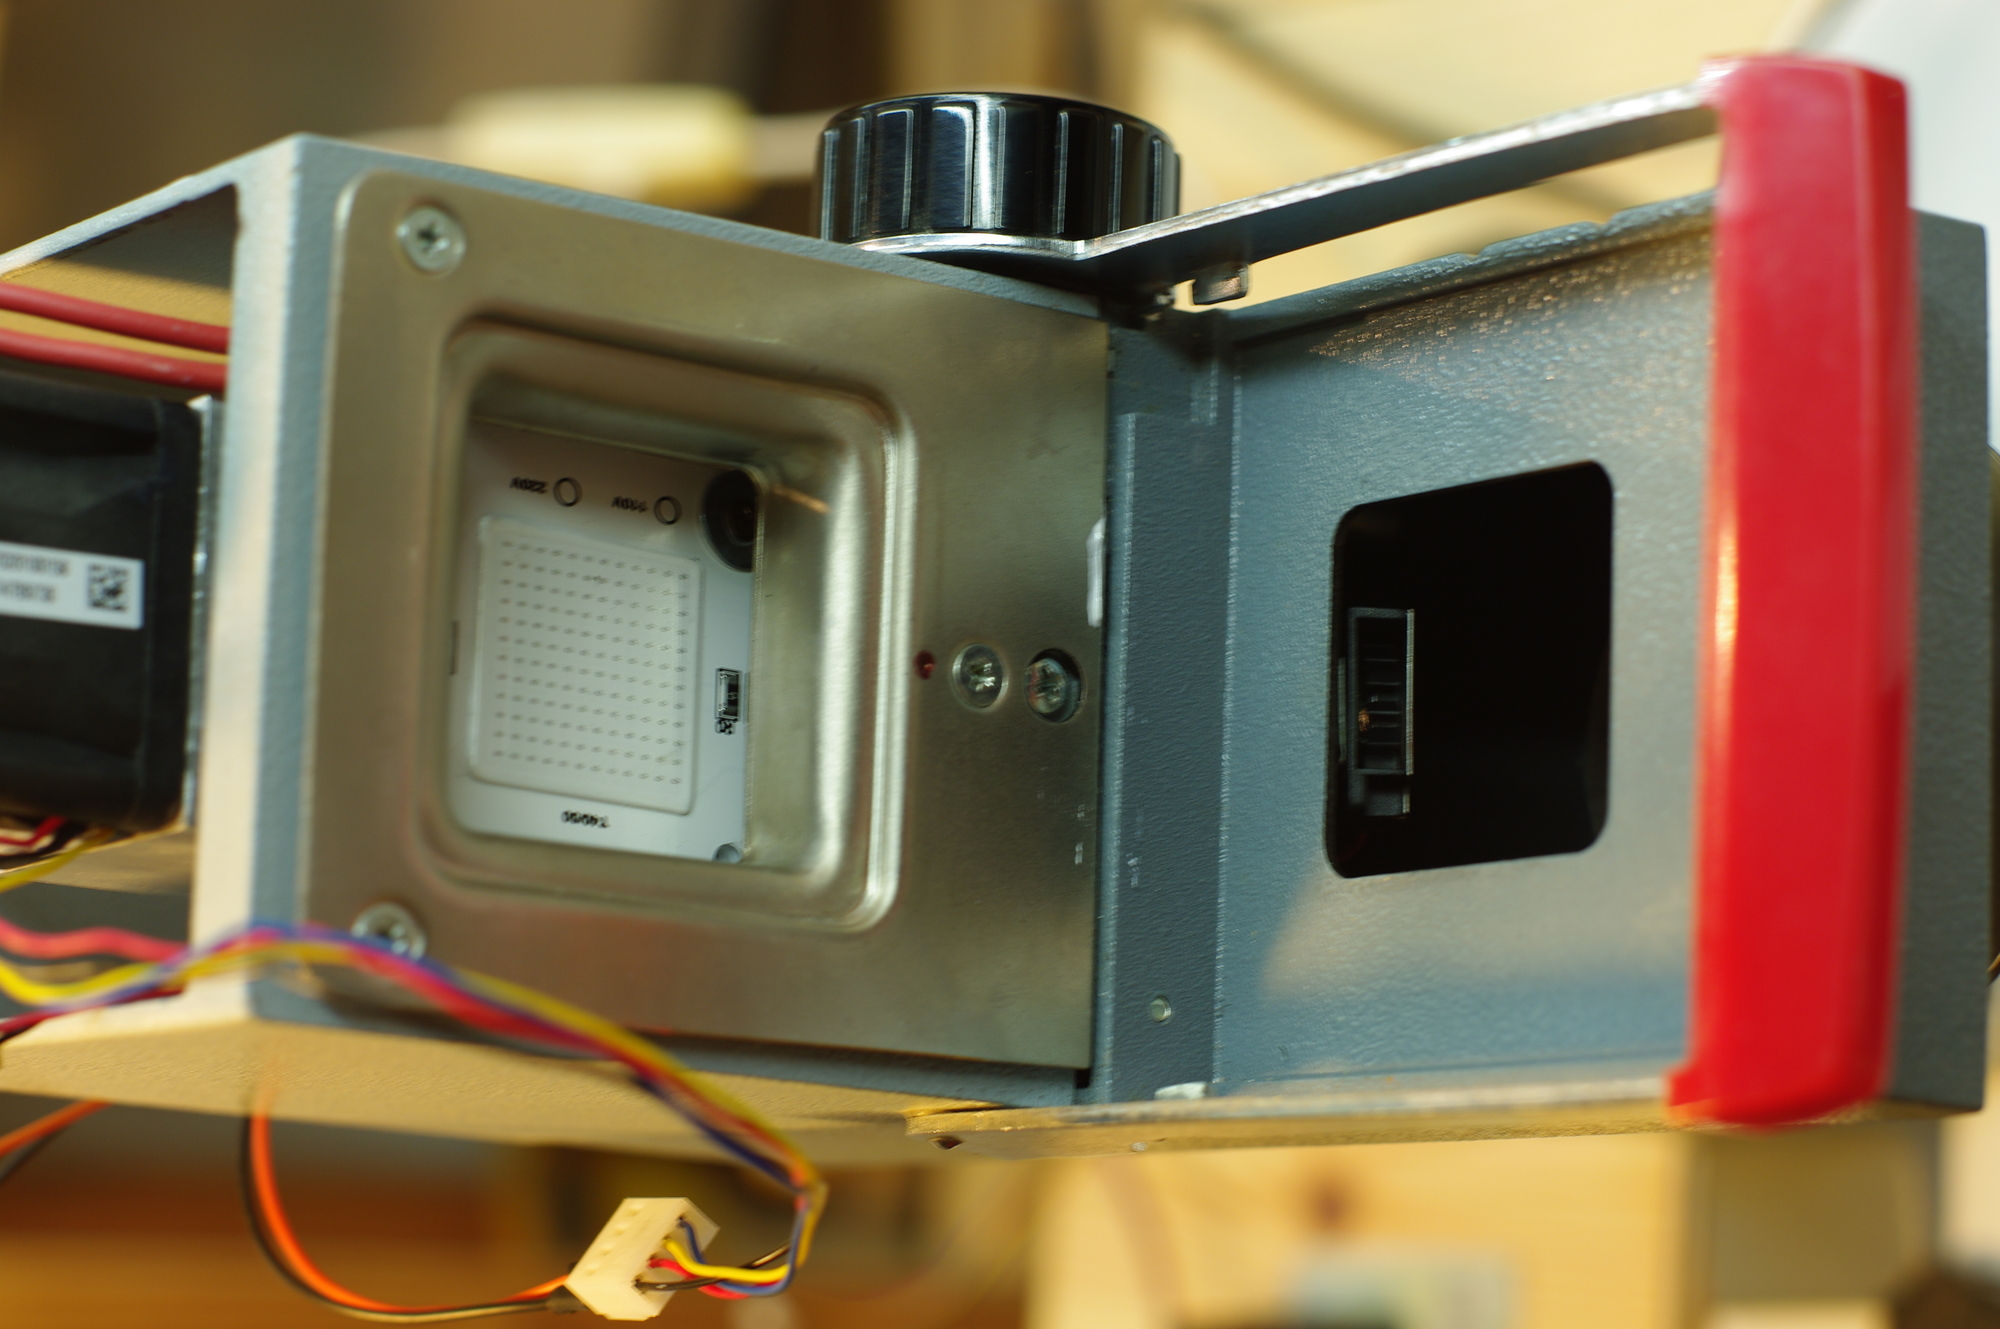
There is more than enough space between the lens bellows and the negative housing to put a small fan. I have found that even a rather weak fan is enough to cool the negative to safe temperatures, even with a quite powerful LED.
The front of the fan can be seen through the square hole below the negative on this picture of the head unit.
The system is controlled by a Raspberry Pi through a USB-controlled power strip,
turned on and off using sispmctl. Exposure takes on the order of 10
minutes for a 10x15cm print at 100W.
After trying a few things I have eventually settled on three formulas that work well for my use cases. Here is the outline, but they are either directly taken or at least derived from Mike Ware's "simple cyanotype" process from his excellent Cyanomicon, which is most probably a better reference than this section.
I prepare 100ml stock solution mixing the following ingredients in order, in a brown glass bottle:
Oxalic acid will never totally dissolve in such a small volume of water, but heating up the water a bit helps, and eventually everything should dissolve correctly after adding the iron(III) nitrate.
I then prepare 10ml of sensitizer at a time, by adding 0,95g of potassium ferricyanide to 10ml of this stock and waiting a few hours until it is correctly dissolved. This is kept in smaller brown glass bottles.
I have found oxalic acid to be fastest, but it is also more difficult to wash out when developing the exposed print. Citric acid is slowest, but widely available and easy to wash out, giving good results. Mixing 5ml of citric acid stock with 5ml of oxalic acid stock gives a fast sensitizer that washes out easily, so that seems like a good solution.
Lately I have experimented with tartaric acid and this seems to give similar results to the citric/oxalic mix, with the added advantage of being totally non-toxic unlike oxalic acid (which should never be ingested).
I have also had some luck using iron sulfate when I didn't have iron nitrate available. I used very impure iron sulfate (that I use in my garden, I think it contains a lot of free sulfur and iron) and had to purify it roughly by filtering, removing sediments, etc, multiple times, but I was surprised to find that it actually works satisfactorily.
I have also experimented with using potassium ferrocyanide instead of the usual ferricyanide. This is called the blue layer process because the sensitizer is light blue rather than the light yellow given by ferricyanide-based sensitizer.
I initially had good results with this, and it turned out to be a very fast sensitizer, but my results very a lot every time I mix a new batch. Probably, the success of this process depends on very narrow parameters. It is also much more sensitive to paper quality, the same batch can work fine on one paper and not at all on another.
I have not yet tried "fancy" papers, my prints are mostly done on Canson C à grain, Canson XL Recycled, and a cheap glossy inkjet photo paper from Aldi.
I find the C à grain to give the best results, but I prefer the smoother XL Recycled paper, which also gives more contrast (my understanding is that the paper is alkaline enough that a little bleaching occurs during washing).
The glossy inkjet photo paper also works quite well, although it is sometimes more difficult to wash out the unexposed sensitizer from it.
I use a 0.2 ml syringe to pour a line of sensitiser on an edge of my paper, and then either brush it towards the other side with a sponge brush, or push it back and forth with a glass rod (actually a glass test tube) until the puddle has more or less vanished depending on the paper I use.
Too many passes with the glass rod lead to blue spots on the paper, which as far as I understand are caused by the slightly uneven surface eventually being bruised leading to crystal formation, or something like that.
Glass rod coating is not possible with inkjet photo paper, as it scratches the fragile glossy surface. Sponge brush coating works well, but care must be taken to coat the surface as evenly as possible, otherwise streaks can remain even after the print is exposed and developed.
The UV light makes it harder to focus, but a focus finder and a pair of sunglasses are enough to do a decent job with 395 nm light (of which a good amount is visible).
I avoid LED or fluorescent lighting as much as possible, and work with only a safelight on, which is probably taking too much caution.
My tap water has a high pH (>8) and is quite hard, which is not good for cyanotypes, it has a bleaching effect that can be useful but difficult to control this way, so I use distilled water (from my clothes dryer).
The prints are first rinsed for ten seconds or so in a small tray of standing water, which I then pour out (it has then acquired a yellow tint) replace with cleaner water, which is again poured out, and I then transfer the paper to a tray containing water with 10% citric acid and a few millilitres of oxygenated water. This brings out the colours faster, although the density of the prints keeps improving over the next hour of drying.
Variations in the concentration of citric acid, and whether this is used as the last or first bath, give different outcomes.
I then simply hang the prints to dry.
Bleaching the prints with my hard, alkaline tap water can improve contrast quite a bit, but I soak the least contrasty prints in 5% sodium carbonate for a few dozens of seconds, until the contrast seems good to me. Within reasonable limits, the maximum density of shadows seems unaffected.
Unfortunately I don't have a flatbed scanner, which makes it difficult to show prints since the paper doesn't stay completely flat after development, and I can't take a photo of it while under glass. So the quality of these pictures leaves to be desired, but the actual prints are very satisfactory to me.
I also don't have that many good photos without people on them, so you'll have to make do with these.
Sluice gate in Vendée, A5 print on Canson C à grain paper

Fern in Brittany, A6 print on Aldi inkjet photo paper

Following Slyka's experiments, I first tried to use a 100W cool white LED, but the results were disappointing. I suspect his own LED to be leaking a significant amount of UV light, as I could never achieve a decent exposure in less than 4 hours with my own.
365 nm is supposed to be the wavelength to which cyanotype chemistry is the most responsive, however glass is much less transparent to this wavelength, and most lens coatings reduce transmittance even more.
My 100W 365 nm LED, although nominally twice as powerful as the 50W 495 nm LED, needed much longer exposures, almost as long as the bright white LED. Of course, I cannot actually verify the wavelength and the luminous output of any of these LEDs, so these findings are only applicable to the particular three LEDs that I own.
I later found out that this LED is only a 20W LED, no wonder why it didn't work well. Much too late to get reimbursed though.
LEDs produce more concentrated and directional light than the traditionnal incandescent bulbs of enlargers, which might make it practical to simply put a LED array slightly larger than 24x36mm directly behind the negative, with maybe an opal glass or plexiglass sheet in between, and greatly reduce the amount of UV filtering. The negatives would have to be very well cooled before trying this.
I do take medium format photos from time to time (6x9 or 6x6) and given the larger area of the negatives, I could probably put more light through them before overheating them. But the Durst M301 enlarger cannot do this format, so I would have to modify my other enlarger, a Meopta Opemus III. Its different construction means the LED radiator would have to change and I would also need a new solution for cooling down the negatives.